
General
Garage Door Insulation: Save Energy, Stay Cozy & Slash Bills

Introduction
Keeping your home cozy and cutting down energy costs doesn’t have to be hard. Especially when your garage door—yes, that big opening in your home—is often the weakest link. With garage door insulation, you can turn that drafty opening into an energy-saving champ. You’ll stop chilly air from sneaking in during winter, block heat in summer, and reduce noisy disruptions from outside. Whether you use your garage as a workshop, storage, or a part‑time gym, this small upgrade can make a big difference.
Whether you’re a DIY lover or thinking of calling a pro, this full guide gives you smart ideas, clear steps, and real‑world tips to get the best garage door insulation results. You’ll learn why it matters, what materials work best, how to install them, and how to keep things efficient—to save money and boost comfort all year long.
Why Garage Door Insulation Matters
H2: Energy Savings & Lower Bills
Insulating your garage door keeps temperature from escaping through that large, thin surface. That means your HVAC system works less—lower energy usage equals smaller bills. In winter, it stops cold air from entering, and in summer, it blocks the heat. A well‑insulated garage door can save you up to 10–15% on heating and cooling costs—money back in your pocket.
H2: Comfort & Noise Reduction
If your garage is attached to your home, cold or heat can sneak in through the door and make adjoining rooms less comfy. Insulation helps maintain even temperatures. Bonus: it muffles noisy traffic, lawn mowers, or loud neighbors—making your space calmer, whether you’re working in the garage or next door.
Understanding Insulation Materials
H2: Common Types of Garage Door Insulation
H3: Polystyrene (Foam Board) Panels
Rigid foam boards—usually polystyrene or polyisocyanurate—are lightweight and easy to handle. You cut them to size and glue or tape them into place. They offer good R‑values (thermal resistance) and don’t absorb moisture.
H3: Reflective Foil Insulation (Radiant Barrier)
These thin sheets reflect radiant heat—handy in hot climates. Reflective foil is lightweight and affordable. For best results, pair it with foam or fiberglass to block both radiant and conductive heat.
H3: Fiberglass Batt Insulation
Traditional blanket insulation with a foil or paper backing. It’s affordable and widely available. It fits into the garage door’s panels, though you must seal edges to keep fibers from shedding. Also, wear gloves and mask during installation.
H3: Polyurethane Spray Foam
Apply directly onto door and framing. Fills cracks and gaps with a tight seal. This method delivers high R‑values and excellent air sealing but costs more and often needs a professional.
Choosing the Right Insulation Material
H2: Match Insulation to Your Climate and Needs
H3: Cold Climates
High R‑value is critical. Foam board or closed‑cell spray foam performs best—you’ll block cold air and keep warmth inside.
H3: Hot Climates
A radiant barrier (reflective foil) helps keep heat out. For extra protection, add foam board or fiberglass behind it.
H3: Moderate Climates
Affordable options like fiberglass or foam board work well here. If noise reduction matters, fiberglass has an edge.
H3: Garage Usage
- Workshop or gym: Strong R‑value like spray foam or foam board offers comfort.
- Simple storage: Budget-friendly fiberglass or foil may suffice.
DIY Installation Guide
H2: Tools & Materials You’ll Need
List before starting:
- Measuring tape
- Utility knife or saw (for foam board)
- Adhesive or insulation tape
- Protective gear (gloves, goggles, mask) for fiberglass
- Straightedge or T-square
- Stapler (optional, for fiberglass)
H2: Step‑by‑Step Instructions
H3: 1. Measure Garage Door Panels
Lift the door and measure each rectangular panel—height, width, and depth. Note the number of panels.
H3: 2. Cut Insulation to Fit
Using your measurements, cut foam or fiberglass to size. Use a straightedge and sharp blade for clean edges.
H3: 3. Secure the Insulation
- Foam board: Apply adhesive to the back and press into the panel.
- Fiberglass batt: Fit snugly into panel grooves. Tape or staple edges to hold.
- Reflective foil: Attach with tape, leaving reflective side facing outward.
H3: 4. Seal the Edges
Use foil tape or silicone caulk around each panel edge to seal air leaks and improve performance.
H3: 5. Test the Door
Lower and raise the door slowly. Ensure insulation doesn’t catch or pinch. Trim edges if needed.
H3: 6. Clean Up & Dispose Safely
Collect scrap pieces. For fiberglass dust, use a damp cloth and wear a mask while cleaning. Dispose of offcuts according to local guidelines.
Tips to Boost Insulation Performance
H2: Perfect the Seals and Weather Stripping
Replace worn bottom and side seals on the garage door. Good weather stripping stops drafts and improves thermal performance.
H2: Insulate Adjacent Walls and Ceiling
For full benefits, insulate surrounding walls and ceiling too. A fully insulated garage retains temperature much better.
H2: Use a Garage Door Threshold Seal
A threshold seal blocks air at the bottom of the door—especially helpful if ground isn’t perfectly level.
H2: Paint or Cover with Durable Surface
For foam board, paint both sides or cover with thin plywood for protection and aesthetics. This also reflects heat in summer.
H2: Regular Maintenance
Check seals yearly. Replace damaged insulation or caulk any cracks to preserve energy savings.
Comparing Costs & Benefits
H2: Cost Breakdown (Approximate)
| Insulation Type | Material Cost (USD) | Installation Effort | R‑Value per Inch | Approx. Total |
|---|---|---|---|---|
| Foam Board | $0.50–$1.50/sq ft | Easy (DIY) | ~5 | $100–$250 |
| Fiberglass Batt | $0.30–$1.00/sq ft | Moderate (DIY) | ~3–3.5 | $60–$180 |
| Reflective Foil | $0.20–$0.70/sq ft | Easy (DIY) | Low (radiant) | $40–$120 |
| Spray Foam (pro) | $1.50–$3.00/sq ft | Professional needed | ~6–7 | $300–$800 |
(Costs vary by region and door size.)
H2: Return on Investment (ROI)
- DIY fiberglass or foam board: 1–3 years ROI via energy savings.
- Spray foam: Higher upfront cost but better performance in extreme climates—ROI may be 2–5 years depending on energy rates.
Plus—added home value, better comfort, and reduced noise make insulation a smart upgrade.
FAQs (Frequently Asked Questions)
Q1: Can I insulate any garage door?
Yes—most sectional or panel garage doors accept insulation. Single-panel doors may be trickier; check thickness and hinge clearance.
Q2: What R‑value should I aim for?
Aim for R‑5 to R‑10 for good effect, depending on climate and usage. Foam board or spray foam help achieve that.
Q3: Is it safe to use fiberglass?
Yes—just wear gloves, goggles, and a mask to avoid irritation from fibers. Seal edges to keep fibers contained.
Q4: Will insulation interfere with door sensors?
Not if properly installed. Trim insulation and ensure no loose edges block sensor paths or wiring.
Q5: Do I need to insulate the ceiling too?
Ideally, yes—heat rises. Insulating ceiling and walls maximizes energy savings and comfort.
Conclusion
Installing garage door insulation is a smart move that brings multiple wins: less energy waste, lower heating and cooling bills, improved comfort, and quieter indoor spaces. Whether you choose cost-effective fiberglass, eco-friendly foam board, or the premium seal of spray foam, the investment quickly pays off. With proper installation, seals, and maintenance, your garage becomes an energy‑efficient zone that enhances your whole home.
Don’t let your garage door remain a weak spot in your home’s thermal envelope. Take action: pick the best insulation type for your climate and needs, follow simple DIY steps, maintain seals, and enjoy a more comfortable, cost‑effective space year‑round. With smart garage door insulation, you’re not just blocking drafts—you’re unlocking long-term comfort and savings.

Introduction
The digital world evolves quickly. Every year, new platforms, tools, and technologies appear that aim to improve how people interact online. One term that has recently started gaining attention is prosonor. Many users are searching for it to understand what it means, how it works, and whether it offers any real benefits in today’s fast-moving online environment.
If you have come across prosonor while browsing the internet or exploring new digital platforms, you may be wondering what it actually represents. This article will explain everything in a clear and simple way. From its possible meaning and features to its benefits and practical uses, this guide will help you understand the concept step by step.
What is Prosonor?
Prosonor is an emerging online concept that has started appearing in search results, digital discussions, and technology-related content. While the term may be used in different contexts, it generally refers to a modern digital system or platform designed to improve the online user experience.
In simple terms, prosonor can be viewed as a concept connected with efficiency, accessibility, and smarter digital interaction. As technology evolves, new tools are constantly created to make online activities easier and faster. This is why users are increasingly curious about new terms that may represent innovative digital solutions.
Why Prosonor Is Becoming Popular
New digital keywords often gain popularity when people start searching for them online. Several factors help explain the growing interest in prosonor.
Increasing Online Curiosity
Whenever a new term begins appearing in search results, users naturally want to learn more about it. Curiosity alone can drive thousands of searches.
Social Media Discussions
Online platforms often spread new trends very quickly. Once a concept begins circulating in communities, it gains visibility and attracts attention.
Digital Innovation
Technology constantly introduces new ideas aimed at improving digital experiences. Concepts like prosonor often emerge from this environment of continuous innovation.
Growing Search Engine Visibility
As more people search for a keyword, search engines recognize the trend and begin displaying more content related to it.
Key Features of Prosonor
Although the exact structure of the platform or concept may vary, several features are commonly associated with modern digital systems like prosonor.
User-Friendly Interface
Most successful digital platforms focus on simplicity. Easy navigation helps users quickly understand how to interact with the system.
Fast Performance
Speed is essential in the modern internet environment. Digital tools often focus on optimizing performance to provide quick results.
Cross-Device Accessibility
Users access online platforms from smartphones, tablets, and computers. A concept such as prosonor may be designed to work smoothly across all devices.
Modern Technology Integration
Digital platforms today often integrate with other services, including cloud systems, automation tools, and smart digital frameworks.
How Prosonor Works
Understanding how digital systems operate helps explain why they attract user attention. The basic idea behind prosonor can be explained in a few simple steps.
Step 1: Platform Access
Users access the platform or service connected with the concept.
Step 2: Smart Data Processing
The system processes information efficiently to deliver results quickly.
Step 3: Improved User Experience
The primary goal is to simplify online interactions and make digital tasks easier to complete.
This approach reflects a common trend in modern technology: creating systems that save time while improving usability.
Benefits of Prosonor
New digital ideas gain traction when they provide real value to users. Several benefits may explain the increasing interest in prosonor.
Improved Online Experience
Users prefer platforms that are easy to navigate and visually clear.
Faster Task Completion
Efficient digital systems help users complete tasks quickly without unnecessary steps.
Accessibility for All Users
Modern platforms aim to be accessible to people with different levels of technical knowledge.
Adaptability
Digital tools must adapt to changing technologies and user needs. Flexible systems tend to remain relevant longer.
Common Use Cases
The concept behind prosonor may be applied across several digital environments depending on how it develops.
Online Platforms
Web platforms frequently adopt new technologies to improve performance and usability.
Digital Communities
Online communities often explore emerging tools and share information about new concepts.
Web Applications
Developers continuously create tools designed to make online activities more efficient.
Content Systems
Some digital platforms focus on improving how users create, manage, and share content online.
Challenges and Limitations
While new technologies can offer exciting opportunities, they may also face certain challenges.
Limited Initial Information
When a concept is still developing, detailed explanations may not yet be widely available.
Rapid Evolution
Digital trends evolve quickly, and their purpose may change as they develop.
Conflicting Online Sources
Different websites may describe the same concept differently. This makes it important to rely on reliable information sources.
Tips for Understanding Emerging Digital Trends
Keeping up with online innovation can help users stay informed about the changing digital landscape.
Follow Trusted Technology Sources
Reliable technology blogs and industry websites often provide accurate insights.
Compare Multiple Perspectives
Reading different articles helps build a more complete understanding.
Stay Updated Regularly
Technology evolves quickly, so checking updates frequently can help you stay informed.
Think Critically
Not every online trend becomes successful. Evaluating information carefully helps users make informed decisions.
The Future of Prosonor
Predicting the future of digital trends is always challenging, but several possibilities exist.
Growth Through Innovation
If the concept proves useful, developers may expand it into more advanced tools or platforms.
Integration With Existing Platforms
Some digital services may adopt ideas related to prosonor to improve their own systems.
Continued Online Interest
As long as users remain curious about new technologies, discussions about emerging concepts will continue.
Frequently Asked Questions (FAQs)
What is prosonor?
Prosonor is an emerging digital term associated with modern online tools or systems designed to improve the digital user experience.
Why is prosonor trending online?
Interest often grows when new digital concepts appear in discussions, forums, or search engine results.
Is prosonor a specific website?
It may represent a broader concept rather than a single platform, depending on the context in which it is used.
Is it safe to explore platforms related to prosonor?
Users should always verify the authenticity and security of any website before interacting with it.
Will prosonor become more popular?
If the concept proves useful and practical, it could gain more attention and adoption in the future.
Conclusion
The internet constantly introduces new ideas and technologies designed to improve how people interact with digital platforms. One topic that has recently gained attention is prosonor. As users continue searching for information about it, interest in the concept continues to grow. Understanding emerging trends helps individuals stay informed about changes in the digital landscape.
Although the future development of prosonor is still uncertain, learning about new digital concepts is always valuable. By staying curious, verifying reliable information, and following technology updates, users can better navigate the evolving online world. The digital future will continue to bring new innovations, and staying informed will always provide an advantage.
Introduction
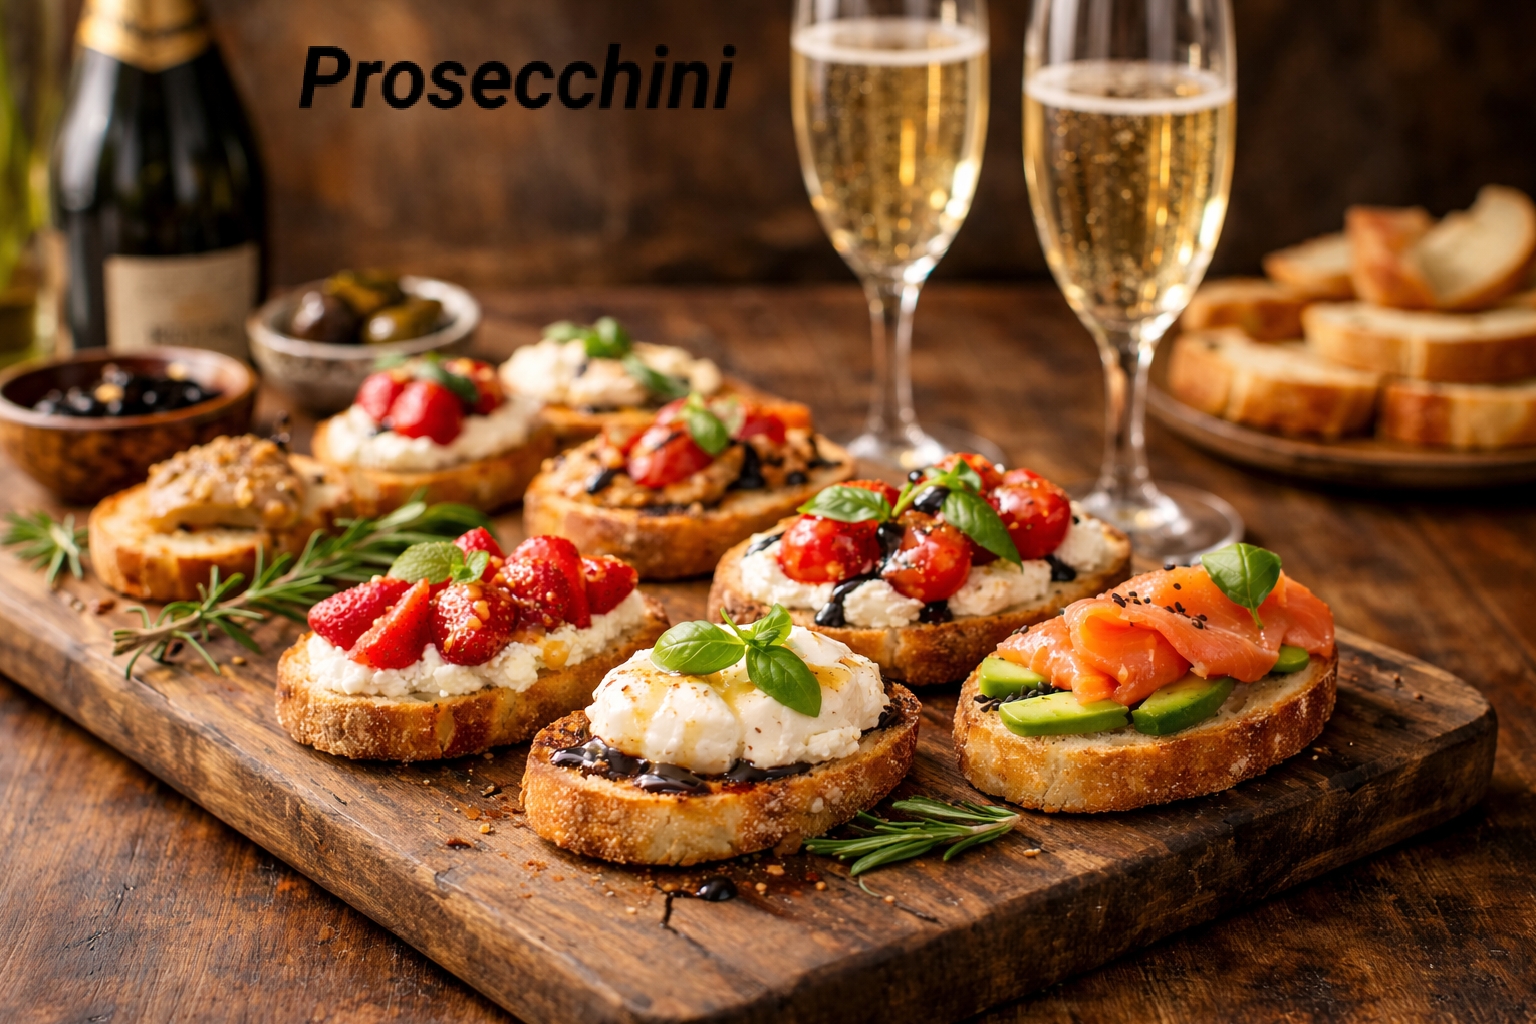
Prosecchini is quickly becoming one of the most searched and talked-about food trends online. If you love Italian flavors, light snacks, and stylish party bites, then prosecchini might become your new favorite treat. This delicious and creative dish combines elegance, taste, and simplicity in one small but powerful bite.
In this complete guide, you will learn everything about prosecchini. We will explore what prosecchini is, where it comes from, how to make it at home, different variations, health benefits, serving ideas, and expert tips. Whether you are a food blogger, home cook, or party host, this guide will help you understand why prosecchini is gaining so much attention and how you can enjoy it too.
What Is Prosecchini?
Prosecchini is a small, flavorful Italian-inspired appetizer. The name comes from the word “Prosecco” and the Italian style of small bites. Prosecchini usually includes fresh ingredients like bread, cheese, herbs, fruits, or cured meats. It is often paired with sparkling drinks, especially prosecco-style beverages.
In simple words, prosecchini is a mini gourmet snack that looks beautiful and tastes amazing. It is light, fresh, and perfect for parties, brunches, or casual evenings with friends.
The Origin of Prosecchini
Prosecchini is inspired by Italian food culture. In Italy, small bites like bruschetta and crostini are very popular. Italians enjoy simple, fresh ingredients and stylish presentation. Prosecchini follows the same idea.
The modern concept of prosecchini became popular through social media. Food influencers started sharing small, elegant snack boards with sparkling drinks. The term prosecchini became trendy as a stylish name for these mini bites served with bubbly beverages.
Why Prosecchini Is So Popular
1. Easy to Make
Prosecchini does not require complicated cooking skills. Most recipes need simple ingredients and quick preparation.
2. Instagram-Friendly
Prosecchini looks beautiful. Bright colors, fresh toppings, and elegant plating make it perfect for photos.
3. Perfect for Parties
Small bites are easy to serve. Guests can grab and enjoy without needing heavy plates or cutlery.
4. Light and Fresh
Many people prefer lighter snacks. Prosecchini offers fresh flavors without feeling too heavy.
Main Ingredients Used in Prosecchini
The beauty of prosecchini is its flexibility. You can create many variations, but here are common ingredients:

Bread Base
- Baguette slices
- Crostini
- Crackers
- Toasted sourdough
Cheese Options
- Mozzarella
- Ricotta
- Cream cheese
- Goat cheese
- Burrata
Toppings
- Cherry tomatoes
- Fresh basil
- Avocado
- Smoked salmon
- Prosciutto
- Strawberries
- Honey
- Olives
Garnishes
- Olive oil drizzle
- Balsamic glaze
- Fresh herbs
- Crushed nuts
How to Make Classic Prosecchini at Home
Making prosecchini is simple. Follow these easy steps:
Step 1: Prepare the Base
Slice your bread thinly and toast it lightly. It should be crispy but not too hard.
Step 2: Add Cheese
Spread a thin layer of cheese on each slice. This creates a creamy base.
Step 3: Add Toppings
Choose your favorite topping. For a classic style, use cherry tomatoes, basil, and a little olive oil.
Step 4: Final Touch
Add a drizzle of balsamic glaze or honey. Serve fresh.
That’s it! Your prosecchini is ready.
Best Prosecchini Flavor Combinations
Here are some delicious prosecchini ideas:
Sweet Prosecchini
- Ricotta + strawberries + honey
- Cream cheese + blueberries + mint
- Goat cheese + figs + walnuts
Savory Prosecchini
- Mozzarella + tomato + basil
- Avocado + smoked salmon + lemon
- Prosciutto + arugula + parmesan
Luxury Prosecchini
- Burrata + truffle oil
- Smoked salmon + caviar
- Brie + pear + honey
Health Benefits of Prosecchini
Prosecchini can be healthy depending on the ingredients you choose.
1. Fresh Vegetables
Tomatoes, avocado, and greens provide vitamins and antioxidants.
2. Healthy Fats
Olive oil and nuts contain healthy fats that support heart health.
3. Portion Control
Prosecchini is small. It helps avoid overeating.
4. Balanced Nutrition
You can mix protein, fiber, and healthy carbs in one bite.
Prosecchini for Different Occasions
Prosecchini for Brunch
Serve light sweet and savory options. Pair with fruit juices or sparkling drinks.
Prosecchini for Weddings
Elegant prosecchini boards add a classy touch to wedding receptions.
Prosecchini for Holiday Parties
Use seasonal ingredients like cranberry, roasted vegetables, or festive herbs.
Prosecchini for Date Night
Create a small plate with romantic flavors like strawberries, chocolate drizzle, or soft cheeses.
How to Present Prosecchini Beautifully
Presentation matters a lot for prosecchini.
- Use wooden boards
- Add fresh herbs for decoration
- Mix colors for visual appeal
- Keep space between pieces
- Use small labels for flavors
A beautiful presentation increases enjoyment and makes it perfect for photos.

Prosecchini vs Bruschetta: What’s the Difference?
Bruschetta is a traditional Italian dish made with grilled bread rubbed with garlic and topped with tomatoes and olive oil.
Prosecchini is more modern and flexible. It includes many flavor styles, sweet or savory, and is often paired with sparkling drinks.
In short, bruschetta is classic, while prosecchini is trendy and creative.
How to Store Prosecchini
Prosecchini tastes best fresh. But if needed:
- Store toppings separately
- Keep bread in an airtight container
- Assemble before serving
- Refrigerate cheese properly
Avoid storing fully assembled prosecchini for too long, as bread can become soft.
Tips to Make the Best Prosecchini
Use Fresh Ingredients
Fresh herbs and ripe fruits improve flavor.
Do Not Overload
Keep toppings balanced. Too many ingredients can make it messy.
Choose Good Bread
Crispy, high-quality bread makes a big difference.
Mix Textures
Combine crunchy, creamy, and soft textures.
Prosecchini for Business and Food Bloggers
If you run a food blog or catering business, prosecchini can help attract customers.
Why It’s Great for Content
- Trending keyword
- Beautiful photography
- Endless recipe ideas
- Party-focused audience
SEO Tip
Use the keyword “prosecchini” naturally in headings and text. Add internal links, quality images, and helpful content for better ranking.
Vegan and Gluten-Free Prosecchini Options
Prosecchini can easily fit special diets.
Vegan Ideas
- Hummus + roasted vegetables
- Avocado + cherry tomatoes
- Vegan cream cheese + cucumber
Gluten-Free Options
- Use gluten-free crackers
- Rice cakes
- Gluten-free bread
This makes prosecchini accessible to more people.
Common Mistakes to Avoid
- Using stale bread
- Adding too much sauce
- Preparing too early
- Ignoring presentation
- Using low-quality ingredients
Avoid these mistakes to make perfect prosecchini every time.
Why Prosecchini Is a Growing Food Trend
The food world loves small, shareable plates. People enjoy experiences, not just meals. Prosecchini fits this trend perfectly.
It combines:
- Social dining
- Visual beauty
- Light eating
- Italian-inspired flavors
This is why prosecchini continues to grow in popularity.
Frequently Asked Questions (FAQs)
What does prosecchini mean?
Prosecchini is a trendy name for small Italian-inspired appetizer bites often paired with sparkling drinks.
Is prosecchini an Italian dish?
It is inspired by Italian food culture but is more of a modern food trend.
Can I make prosecchini ahead of time?
You can prepare ingredients ahead, but assemble just before serving for best results.
Is prosecchini healthy?
Yes, it can be healthy if made with fresh vegetables, healthy fats, and moderate portions.
What drinks go best with prosecchini?
Sparkling water, fruit juices, or prosecco-style drinks pair well.
Can I make sweet prosecchini?
Yes! Use fruits, honey, and soft cheeses for sweet versions.
Conclusion
Prosecchini is more than just a snack. It is a modern food experience that combines style, flavor, and creativity. With simple ingredients and endless combinations, anyone can make beautiful and delicious prosecchini at home. From sweet to savory, from casual gatherings to elegant events, prosecchini fits every occasion perfectly.
As food trends continue to evolve, prosecchini stands out because it is flexible, easy, and visually stunning. If you want to impress guests, grow your food blog, or simply enjoy a fresh and light appetizer, prosecchini is the perfect choice. Start experimenting today and create your own signature prosecchini recipes that everyone will love.

In the Indian investment landscape, only a few market indices are capable of tracking the pulse of an economy. The major benchmarks, such as the Sensex and Nifty 50, often receive more attention, whereas the BSE 500 Index presents a holistic view of India’s vast and evolving corporate landscape. In this blog, we will understand how the BSE 500 index captures the growth story of India.
Overview of the BSE 500 index
BSE 500 is an index that comprises the top 500 listed companies on the Bombay Stock Exchange and accounts for approximately 93% market capitalisation on BSE. This makes it one of the most accurate index representatives of India’s growth story, reflecting the collective performance of both established leaders and emerging businesses.
In contrast to specialised indices such as Sensex (30 stocks) or Nifty 50(50 stocks), BSE 500 represents a broad spectrum of the Indian market, including giants like Reliance Industries and Infosys, to new, innovative, and rapidly growing mid-caps and small-caps in the pharmaceutical, banking, energy, and technology sectors.
This broader depiction, therefore, assists investors not only in understanding market health but also the market sentiment and current trends in the corporate sector of India.
A mirror to India’s economic evolution
The Indian economy has now reached a pivotal stage where it focuses more on becoming self-reliant. As one of the fastest-growing major economies, it has continued to benefit from domestic consumption growth, digitalisation, and infrastructure reform initiatives by the government. The BSE 500 captures these dynamics through its balanced sector-wise allocations, which range from financials, manufacturing sectors, to IT, energy, and consumer goods.
The BSE 500 index gives a true representation of India’s growth story because of its rapid adaptation to changes in market trends. For example, when there is an upswing in emerging tech companies, their weightage in the index rises.
Why tracking the BSE 500 matters for investors
For investors, the BSE 500 index is useful in terms of diversification and knowledge gain. Since it covers the 500 stocks of the 20+ sectors, it reduces the concentration risk. Investors pay attention to the BSE 500 for the following reasons:
- Comprehensive market coverage: It covers large, mid, and small-cap stocks.
- Balanced representation: It represents the leaders of the different sectors of the economy, as well as the new emerging forces who will be responsible for the future of India.
- Economic insight: It functions as an indicator for economic activity or growth patterns of India.
- Benchmarking tool: This enables an investor to check their portfolio performance relative to India’s corporate health.
Investing in India’s growth through the BSE 500
For those investors seeking to tap into the theme of India’s economic growth, they can do so by investing in BSE 500 index fund products. There are index fund products that track the BSE 500 index passively, providing investors with broad exposure to the Indian equity market in a diversified manner.
Since the BSE 500-index tracking funds replicate the performance of the index, investors automatically get diversification and cost efficiency without having to trade multiple stocks. Investors who are bullish about the growth story of the Indian economy can easily opt for investments in Index funds tracking the BSE 500 index through various brokerage platforms.
In a broader scenario, the BSE 500 index funds are one-stop investments for being a part of the multi-sectoral growth story of the Indian markets, be it consumer products, technology developments, finance sectors, or export sectors.
The bottom line
The BSE-500 Index is much more than a benchmark representing stock prices; it is an evolving progression of India’s economic story. The wide sector and market-cap coverage of the BSE-500 index reflects how India has grown to be a strong, aspiring, and progressive nation in today’s global world. Tracking the BSE 500 is one of the most efficient methods for investors wanting to tap into India’s growth story.


 General4 months ago
Darkzadie Ren Telegram: The Ultimate Guide to the Viral Channel Everyone’s Talking About

 Finance7 months ago
Master Money Saving with GoMyFinance.com: Smart Tips for Your Future

 Entertainment5 months ago
Banflix: The Complete Guide to the Trending Streaming Platform

 General7 months ago
Simpcity.su Exposed: What It Is, Why It’s Popular, and Why You Should Stay Away
 Education & Learning6 months ago
FamilyZilla.com – The Go-To Hub for Modern Families

 Tech2 months ago
Hentairead: A Complete Expert Guide to What It Is, How It Works, and What to Know

 Entertainment7 months ago
AnimeKai: The Ultimate Home for Anime Lovers in 2025
 General3 months ago
Honda Pilot 2025 – Full Review, Features, Price, Specs & Why It’s the Best Family SUV