
General
Glow with Confidence: The Ultimate Guide to Choosing and Using Self Tanner for a Beautiful, Sun-Kissed Glow

Introduction
Looking for that effortless, radiant glow without the sun damage? A self tanner can be your secret weapon. These user-friendly, sun-free products let you achieve that gorgeous, healthy tan from the comfort of your home. Whether you’re aiming to avoid harmful UV rays or skip the salon altogether, self tanner gives you all the benefits—fast results, customizable shades, and glowing confidence—all in one bottle.
In this guide, we’ll walk you through everything you need to know about self tanner. From picking the perfect formula and prepping your skin, to precise application techniques and how to keep your glow long-lasting—we’ve got you covered. You’ll also find real-world tips that the pros love, breakdowns of helpful terms, and handy FAQs. Ready to unlock that sun-kissed radiance? Let’s glow!
Why Choose a Self Tanner
Safe, Sun-Free Bronzing
Self tanner gives you a beautiful tan without UV exposure, reducing your risk of sunburn, premature aging, and skin damage. You get that beachy glow—no beach required.
Customizable and Convenient
With a variety of formulas and shades, you’re in control. Whether you want a subtle glow or a deep bronze, you can tan on your terms and in your own time.
Boosts Confidence Instantly
A golden tan brings out your natural glow and can boost self-esteem. Many people feel more confident and vibrant after using a self tanner.
How to Choose the Right Self Tanner
Know Your Formula: Lotion, Mousse, or Drops
- Lotion or Cream: Moisturizing and great for beginners.
- Mousse: Lightweight and dries quickly, ideal for oily skin.
- Tanning Drops: Mix with your daily moisturizer for gradual color.
Pick a Shade That Matches Your Skin Tone
Lighter skin tones should go with fair-to-medium tanners. Medium or deeper skin tones can handle darker shades. Avoid shades that are too orange—they look fake.
Check for Skin-Friendly Ingredients
Choose products with nourishing ingredients like aloe vera, vitamin E, and DHA (a plant-based active tanning agent). Avoid sulfates and artificial fragrances if you have sensitive skin.
Read Reviews Before Buying
Look for reviews from people with similar skin types. Check for mentions of even fading, easy application, and realistic color payoff.
Prepping Your Skin: A Critical Step
Exfoliate First
Use a gentle scrub or exfoliating mitt to remove dead skin. This helps the tanner apply evenly and avoids blotchy or patchy spots.
Moisturize Dry Areas
Focus on areas like elbows, knees, ankles, wrists, and feet. These spots absorb more product and can turn darker without a base layer of hydration.
Hair Removal Timing Matters
Shave or wax at least 24 hours before applying self tanner to avoid irritation and uneven tone.
Start with Clean, Dry Skin
No lotions, oils, or perfumes before you apply. These create a barrier that prevents proper absorption.
How to Apply Self Tanner Like a Pro
Use a Tanning Mitt or Gloves
Avoid orange palms and streaks by using a mitt. It blends product evenly and saves your hands.
Apply in Sections and Thin Layers
Start from your legs and work upward. Apply in small, circular motions and don’t overdo it—a little goes a long way.
Blend, Blend, Blend
Take extra time around joints, feet, and hairline. Use leftover product on the mitt to softly blend these areas for a natural look.
Let It Dry Fully
Wait 10–15 minutes before dressing. Wear loose, dark clothes to avoid staining and let the color develop without disruption.
Avoid Water and Sweat
Stay dry for 6–8 hours after applying. Don’t shower, swim, or work out—this can ruin the tan before it sets.
Maintaining Your Tan for Longer
Use a Gentle Rinse for First Shower
When it’s time to rinse, use lukewarm water without soap. Gently pat your skin dry instead of rubbing.
Moisturize Daily
Hydrated skin holds onto color longer. Apply body lotion or oil every day to prevent dry patches and early fading.
Touch Up Every Few Days
Apply a small amount of tanner every 2–3 days to build or maintain your glow. Gradual tanners work well for this.
Avoid Harsh Exfoliants
Use mild body washes and soft cloths to keep the tan even as it fades. Harsh scrubs can cause streaks or patchy loss.
Common Mistakes and How to Avoid Them
Applying Too Much Product
One of the biggest mistakes! Heavy application leads to orange tones or streaks. Always start light—you can layer later.
Skipping Exfoliation
If you don’t exfoliate first, your tan will cling to dry skin and appear patchy or dirty. Always prep your skin.
Not Blending Properly
Make sure to blend well around wrists, ankles, knees, and elbows. These areas often give away fake tans if not handled carefully.
Wearing Tight Clothes Too Soon
Skin-tight clothes can smudge your tan. Loose, dark clothing is your best friend during the drying stage.
Pro Tips for a Next-Level Tan
Mix Tanning Drops with Face Cream
Customize your glow and keep it light for your face. Drops allow control and gradual build-up.
Use a Gradual Tanner Between Applications
Great for beginners or for maintaining your tan. Apply every other day to avoid reapplying full-strength tanner too often.
Highlight Your Tan with Body Oil
For an added glow, apply shimmering body oil to your shoulders, collarbones, and legs.
Tan at Night
Apply before bed and wake up glowing! Just use old sheets or a tan-safe sheet protector to avoid staining.
FAQs
How long does a self tanner last?
Most self tanners last between 5 to 7 days. With good prep and maintenance, you can extend it to 10 days.
Can I use self tanner on my face?
Yes—but choose a product designed for facial skin. They are usually gentler and won’t clog pores.
Does self tanner stain clothes or sheets?
Some formulas might stain. Always let your tan dry completely and use dark or old clothing/sheets for safety.
What if my tan turns out orange?
Try switching to a cooler-toned or lighter formula. Or apply in thinner layers. Orange tones often come from over-application or low-quality products.
How do I remove a self tanner fast?
Soak in a warm bath with baking soda or use a tan eraser or exfoliating mitt. Be gentle to avoid skin damage.
Conclusion
Embracing self tanner is a fun, healthy, and confidence-boosting way to enjoy a bronzed glow—no sun needed. With the right prep, the perfect product, and smart application, anyone can get that natural-looking tan at home.
Forget waiting for summer or worrying about sun damage. With this guide, you can glow any time of the year. Whether you’re a beginner or a seasoned tanner, these tips will keep your skin looking radiant, smooth, and flawlessly sun-kissed.
Introduction
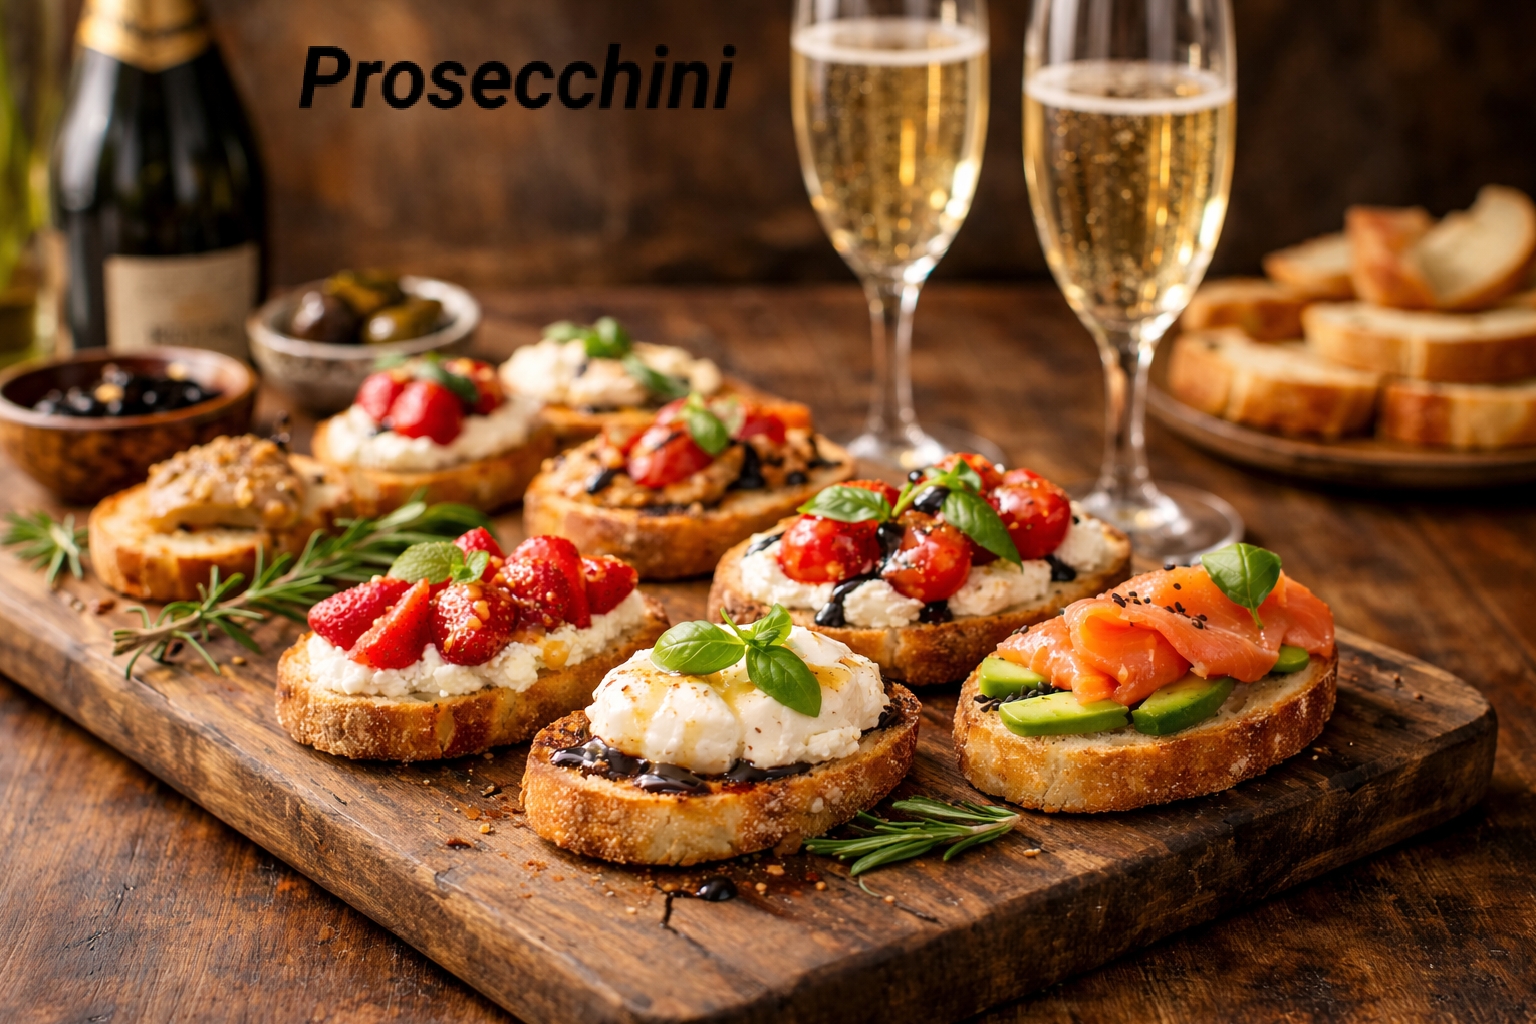
Prosecchini is quickly becoming one of the most searched and talked-about food trends online. If you love Italian flavors, light snacks, and stylish party bites, then prosecchini might become your new favorite treat. This delicious and creative dish combines elegance, taste, and simplicity in one small but powerful bite.
In this complete guide, you will learn everything about prosecchini. We will explore what prosecchini is, where it comes from, how to make it at home, different variations, health benefits, serving ideas, and expert tips. Whether you are a food blogger, home cook, or party host, this guide will help you understand why prosecchini is gaining so much attention and how you can enjoy it too.
What Is Prosecchini?
Prosecchini is a small, flavorful Italian-inspired appetizer. The name comes from the word “Prosecco” and the Italian style of small bites. Prosecchini usually includes fresh ingredients like bread, cheese, herbs, fruits, or cured meats. It is often paired with sparkling drinks, especially prosecco-style beverages.
In simple words, prosecchini is a mini gourmet snack that looks beautiful and tastes amazing. It is light, fresh, and perfect for parties, brunches, or casual evenings with friends.
The Origin of Prosecchini
Prosecchini is inspired by Italian food culture. In Italy, small bites like bruschetta and crostini are very popular. Italians enjoy simple, fresh ingredients and stylish presentation. Prosecchini follows the same idea.
The modern concept of prosecchini became popular through social media. Food influencers started sharing small, elegant snack boards with sparkling drinks. The term prosecchini became trendy as a stylish name for these mini bites served with bubbly beverages.
Why Prosecchini Is So Popular
1. Easy to Make
Prosecchini does not require complicated cooking skills. Most recipes need simple ingredients and quick preparation.
2. Instagram-Friendly
Prosecchini looks beautiful. Bright colors, fresh toppings, and elegant plating make it perfect for photos.
3. Perfect for Parties
Small bites are easy to serve. Guests can grab and enjoy without needing heavy plates or cutlery.
4. Light and Fresh
Many people prefer lighter snacks. Prosecchini offers fresh flavors without feeling too heavy.
Main Ingredients Used in Prosecchini
The beauty of prosecchini is its flexibility. You can create many variations, but here are common ingredients:

Bread Base
- Baguette slices
- Crostini
- Crackers
- Toasted sourdough
Cheese Options
- Mozzarella
- Ricotta
- Cream cheese
- Goat cheese
- Burrata
Toppings
- Cherry tomatoes
- Fresh basil
- Avocado
- Smoked salmon
- Prosciutto
- Strawberries
- Honey
- Olives
Garnishes
- Olive oil drizzle
- Balsamic glaze
- Fresh herbs
- Crushed nuts
How to Make Classic Prosecchini at Home
Making prosecchini is simple. Follow these easy steps:
Step 1: Prepare the Base
Slice your bread thinly and toast it lightly. It should be crispy but not too hard.
Step 2: Add Cheese
Spread a thin layer of cheese on each slice. This creates a creamy base.
Step 3: Add Toppings
Choose your favorite topping. For a classic style, use cherry tomatoes, basil, and a little olive oil.
Step 4: Final Touch
Add a drizzle of balsamic glaze or honey. Serve fresh.
That’s it! Your prosecchini is ready.
Best Prosecchini Flavor Combinations
Here are some delicious prosecchini ideas:
Sweet Prosecchini
- Ricotta + strawberries + honey
- Cream cheese + blueberries + mint
- Goat cheese + figs + walnuts
Savory Prosecchini
- Mozzarella + tomato + basil
- Avocado + smoked salmon + lemon
- Prosciutto + arugula + parmesan
Luxury Prosecchini
- Burrata + truffle oil
- Smoked salmon + caviar
- Brie + pear + honey
Health Benefits of Prosecchini
Prosecchini can be healthy depending on the ingredients you choose.
1. Fresh Vegetables
Tomatoes, avocado, and greens provide vitamins and antioxidants.
2. Healthy Fats
Olive oil and nuts contain healthy fats that support heart health.
3. Portion Control
Prosecchini is small. It helps avoid overeating.
4. Balanced Nutrition
You can mix protein, fiber, and healthy carbs in one bite.
Prosecchini for Different Occasions
Prosecchini for Brunch
Serve light sweet and savory options. Pair with fruit juices or sparkling drinks.
Prosecchini for Weddings
Elegant prosecchini boards add a classy touch to wedding receptions.
Prosecchini for Holiday Parties
Use seasonal ingredients like cranberry, roasted vegetables, or festive herbs.
Prosecchini for Date Night
Create a small plate with romantic flavors like strawberries, chocolate drizzle, or soft cheeses.
How to Present Prosecchini Beautifully
Presentation matters a lot for prosecchini.
- Use wooden boards
- Add fresh herbs for decoration
- Mix colors for visual appeal
- Keep space between pieces
- Use small labels for flavors
A beautiful presentation increases enjoyment and makes it perfect for photos.

Prosecchini vs Bruschetta: What’s the Difference?
Bruschetta is a traditional Italian dish made with grilled bread rubbed with garlic and topped with tomatoes and olive oil.
Prosecchini is more modern and flexible. It includes many flavor styles, sweet or savory, and is often paired with sparkling drinks.
In short, bruschetta is classic, while prosecchini is trendy and creative.
How to Store Prosecchini
Prosecchini tastes best fresh. But if needed:
- Store toppings separately
- Keep bread in an airtight container
- Assemble before serving
- Refrigerate cheese properly
Avoid storing fully assembled prosecchini for too long, as bread can become soft.
Tips to Make the Best Prosecchini
Use Fresh Ingredients
Fresh herbs and ripe fruits improve flavor.
Do Not Overload
Keep toppings balanced. Too many ingredients can make it messy.
Choose Good Bread
Crispy, high-quality bread makes a big difference.
Mix Textures
Combine crunchy, creamy, and soft textures.
Prosecchini for Business and Food Bloggers
If you run a food blog or catering business, prosecchini can help attract customers.
Why It’s Great for Content
- Trending keyword
- Beautiful photography
- Endless recipe ideas
- Party-focused audience
SEO Tip
Use the keyword “prosecchini” naturally in headings and text. Add internal links, quality images, and helpful content for better ranking.
Vegan and Gluten-Free Prosecchini Options
Prosecchini can easily fit special diets.
Vegan Ideas
- Hummus + roasted vegetables
- Avocado + cherry tomatoes
- Vegan cream cheese + cucumber
Gluten-Free Options
- Use gluten-free crackers
- Rice cakes
- Gluten-free bread
This makes prosecchini accessible to more people.
Common Mistakes to Avoid
- Using stale bread
- Adding too much sauce
- Preparing too early
- Ignoring presentation
- Using low-quality ingredients
Avoid these mistakes to make perfect prosecchini every time.
Why Prosecchini Is a Growing Food Trend
The food world loves small, shareable plates. People enjoy experiences, not just meals. Prosecchini fits this trend perfectly.
It combines:
- Social dining
- Visual beauty
- Light eating
- Italian-inspired flavors
This is why prosecchini continues to grow in popularity.
Frequently Asked Questions (FAQs)
What does prosecchini mean?
Prosecchini is a trendy name for small Italian-inspired appetizer bites often paired with sparkling drinks.
Is prosecchini an Italian dish?
It is inspired by Italian food culture but is more of a modern food trend.
Can I make prosecchini ahead of time?
You can prepare ingredients ahead, but assemble just before serving for best results.
Is prosecchini healthy?
Yes, it can be healthy if made with fresh vegetables, healthy fats, and moderate portions.
What drinks go best with prosecchini?
Sparkling water, fruit juices, or prosecco-style drinks pair well.
Can I make sweet prosecchini?
Yes! Use fruits, honey, and soft cheeses for sweet versions.
Conclusion
Prosecchini is more than just a snack. It is a modern food experience that combines style, flavor, and creativity. With simple ingredients and endless combinations, anyone can make beautiful and delicious prosecchini at home. From sweet to savory, from casual gatherings to elegant events, prosecchini fits every occasion perfectly.
As food trends continue to evolve, prosecchini stands out because it is flexible, easy, and visually stunning. If you want to impress guests, grow your food blog, or simply enjoy a fresh and light appetizer, prosecchini is the perfect choice. Start experimenting today and create your own signature prosecchini recipes that everyone will love.

In the Indian investment landscape, only a few market indices are capable of tracking the pulse of an economy. The major benchmarks, such as the Sensex and Nifty 50, often receive more attention, whereas the BSE 500 Index presents a holistic view of India’s vast and evolving corporate landscape. In this blog, we will understand how the BSE 500 index captures the growth story of India.
Overview of the BSE 500 index
BSE 500 is an index that comprises the top 500 listed companies on the Bombay Stock Exchange and accounts for approximately 93% market capitalisation on BSE. This makes it one of the most accurate index representatives of India’s growth story, reflecting the collective performance of both established leaders and emerging businesses.
In contrast to specialised indices such as Sensex (30 stocks) or Nifty 50(50 stocks), BSE 500 represents a broad spectrum of the Indian market, including giants like Reliance Industries and Infosys, to new, innovative, and rapidly growing mid-caps and small-caps in the pharmaceutical, banking, energy, and technology sectors.
This broader depiction, therefore, assists investors not only in understanding market health but also the market sentiment and current trends in the corporate sector of India.
A mirror to India’s economic evolution
The Indian economy has now reached a pivotal stage where it focuses more on becoming self-reliant. As one of the fastest-growing major economies, it has continued to benefit from domestic consumption growth, digitalisation, and infrastructure reform initiatives by the government. The BSE 500 captures these dynamics through its balanced sector-wise allocations, which range from financials, manufacturing sectors, to IT, energy, and consumer goods.
The BSE 500 index gives a true representation of India’s growth story because of its rapid adaptation to changes in market trends. For example, when there is an upswing in emerging tech companies, their weightage in the index rises.
Why tracking the BSE 500 matters for investors
For investors, the BSE 500 index is useful in terms of diversification and knowledge gain. Since it covers the 500 stocks of the 20+ sectors, it reduces the concentration risk. Investors pay attention to the BSE 500 for the following reasons:
- Comprehensive market coverage: It covers large, mid, and small-cap stocks.
- Balanced representation: It represents the leaders of the different sectors of the economy, as well as the new emerging forces who will be responsible for the future of India.
- Economic insight: It functions as an indicator for economic activity or growth patterns of India.
- Benchmarking tool: This enables an investor to check their portfolio performance relative to India’s corporate health.
Investing in India’s growth through the BSE 500
For those investors seeking to tap into the theme of India’s economic growth, they can do so by investing in BSE 500 index fund products. There are index fund products that track the BSE 500 index passively, providing investors with broad exposure to the Indian equity market in a diversified manner.
Since the BSE 500-index tracking funds replicate the performance of the index, investors automatically get diversification and cost efficiency without having to trade multiple stocks. Investors who are bullish about the growth story of the Indian economy can easily opt for investments in Index funds tracking the BSE 500 index through various brokerage platforms.
In a broader scenario, the BSE 500 index funds are one-stop investments for being a part of the multi-sectoral growth story of the Indian markets, be it consumer products, technology developments, finance sectors, or export sectors.
The bottom line
The BSE-500 Index is much more than a benchmark representing stock prices; it is an evolving progression of India’s economic story. The wide sector and market-cap coverage of the BSE-500 index reflects how India has grown to be a strong, aspiring, and progressive nation in today’s global world. Tracking the BSE 500 is one of the most efficient methods for investors wanting to tap into India’s growth story.

Introduction
Online platforms are growing very fast, and many websites claim to offer entertainment, gaming, or digital experiences. One name that often appears in online searches is betfairplay777.com. People search for this website to understand what it is, how it works, and whether it is safe to use. This article is written to help readers clearly understand the platform in simple and easy English.
It is important to know that platforms related to betting or gaming should always be approached with awareness and responsibility. This guide is purely informational, focusing on features, user experience, safety awareness, and common questions. It does not promote gambling and is intended only for readers who want general knowledge about betfairplay777.com.
What Is Betfairplay777.com?
Betfairplay777.com is a website that is commonly associated with online gaming and betting-related services. Many users come across this domain through search engines, referrals, or online discussions and want to know what the platform offers.
The website appears to be designed for users looking for digital gaming experiences. Like many similar platforms, it focuses on interactive content, user accounts, and online accessibility. However, users must always remember that such platforms are meant only for adults and may not be legal in all regions.
Purpose of Betfairplay777.com
The main purpose of betfairplay777.com is to provide an online space where users can explore gaming-related features. The website typically focuses on:
- Online entertainment services
- Digital game-based activities
- User engagement through accounts
- Web-based accessibility on different devices
It is essential to understand that availability and legality depend on local laws and regulations, which vary from country to country.
User Interface and Website Design
Simple Layout and Navigation
Betfairplay777.com appears to follow a straightforward website layout. The homepage usually presents core sections clearly, making navigation easier for users who are familiar with online platforms.
Key design elements often include:
- Clean menus
- Simple color combinations
- Organized sections
- Mobile-friendly design
Mobile and Desktop Compatibility
Many users prefer accessing platforms on their smartphones. Betfairplay777.com is generally designed to work on:
- Mobile phones
- Tablets
- Desktop browsers
This helps users access the site without needing additional software.
Account Registration Overview
Basic Sign-Up Structure
Most platforms like betfairplay777.com require users to create an account. The process usually involves:
- Providing basic details
- Creating a username and password
- Agreeing to terms and conditions
Age Verification Importance
Users should be aware that only adults are legally allowed to create accounts on such platforms. Age verification is a critical step, and minors should never attempt to register.
Features Commonly Found on Betfairplay777.com
User Dashboard
Once logged in, users typically see a dashboard where activity, options, and settings are displayed. This dashboard helps users manage their accounts easily.
Game Categories
Platforms like betfairplay777.com often organize content into categories so users can browse without confusion.
Customer Support Access
Many users search for customer support details. These platforms often provide:
- Online support options
- Help sections
- Frequently Asked Questions
Safety and Security Awareness
Data Protection
When using any online platform, data safety is important. Users should always check whether:
- The site uses secure connections (HTTPS)
- Privacy policies are clearly stated
- Personal information is protected
User Responsibility
Online gaming platforms require users to act responsibly. Spending time or money without control can lead to problems. Awareness is key.
Legal Considerations You Should Know
Country-Specific Laws
The legality of websites like betfairplay777.com depends on the laws of your country or region. Some countries allow online gaming, while others restrict or ban it.
Why Legal Awareness Matters
Using a platform that is not permitted in your location may result in:
- Account restrictions
- Financial risks
- Legal complications
Always check local laws before engaging with any online gaming website.
Responsible Use and Awareness
Set Personal Limits
Responsible use means:
- Limiting time spent online
- Avoiding emotional decisions
- Never chasing losses
Avoid Harmful Behavior
Online gaming should never affect:
- Mental health
- Education or work
- Personal relationships
If a platform causes stress, it is better to stop using it.
Why People Search for Betfairplay777.com
Many users search for betfairplay777.com because they want:
- Honest information
- Safety details
- User experience insights
- Legal clarity
This article is designed to answer those questions in a neutral and informative way.
SEO Insight: Why Betfairplay777.com Is Trending
From an SEO perspective, the keyword betfairplay777.com gains searches because:
- It is a niche-specific domain
- Users want reviews and explanations
- People prefer detailed guides before visiting websites
Search engines rank content that is helpful, original, and user-focused.
Common Mistakes Users Should Avoid
Ignoring Terms and Conditions
Many users skip reading policies, which can lead to misunderstandings later.
Sharing Personal Information
Never share passwords or sensitive details with anyone.
Assuming Legality Everywhere
Just because a website exists does not mean it is legal in all regions.
Advantages and Limitations Overview
Possible Advantages
- Easy online access
- Organized interface
- Digital convenience
Possible Limitations
- Legal restrictions
- Age limitations
- Risk of misuse if not used responsibly
FAQs About Betfairplay777.com
Is betfairplay777.com legal to use?
Legality depends on your country’s laws. Always check local regulations before accessing the site.
Is betfairplay777.com safe?
Safety depends on user awareness, data protection measures, and responsible usage.
Can minors use betfairplay777.com?
No. Platforms like this are intended strictly for adults only.
Do I need to create an account?
Most features usually require account registration.
Should I use real money on such platforms?
Users should be cautious and informed. Never use money you cannot afford to lose.
Conclusion
Betfairplay777.com is a website that attracts attention due to its association with online gaming and digital entertainment. Many users search for reliable information before visiting such platforms, and understanding the basics is essential. From website design to safety awareness, every detail matters when exploring online platforms.
Before using betfairplay777.com, users should always prioritize legal awareness, personal safety, and responsible behavior. This guide is meant to provide clear, original, and easy-to-understand information so readers can make informed decisions. Knowledge, caution, and responsibility are always more important than curiosity when it comes to online gaming platforms.


 General4 months ago
Darkzadie Ren Telegram: The Ultimate Guide to the Viral Channel Everyone’s Talking About

 Finance7 months ago
Master Money Saving with GoMyFinance.com: Smart Tips for Your Future

 Entertainment4 months ago
Banflix: The Complete Guide to the Trending Streaming Platform

 General7 months ago
Simpcity.su Exposed: What It Is, Why It’s Popular, and Why You Should Stay Away

 Entertainment7 months ago
AnimeKai: The Ultimate Home for Anime Lovers in 2025
 Education & Learning6 months ago
FamilyZilla.com – The Go-To Hub for Modern Families

 Tech2 months ago
Hentairead: A Complete Expert Guide to What It Is, How It Works, and What to Know
 General2 months ago
Honda Pilot 2025 – Full Review, Features, Price, Specs & Why It’s the Best Family SUV